How to Fix a Running Toilet: Diagnose and Repair in 20 Minutes
Stop a running or ghost-flushing toilet in under 20 minutes. Diagnose the flapper, fill valve, or float issue, buy the right $5-$20 part, and fix it yourself.
A running toilet is almost always one of three things broken, and all three are $5-$20 fixes that take 20 minutes. The hard part isn't the fix — it's knowing which of the three it is before you go to the store.
This guide spends the first five minutes teaching you to read the inside of your tank. Once you know what's wrong, the fix is trivial. Guess wrong and you'll replace the $5 flapper three times while the $15 fill valve silently wastes water.
The stakes are higher than most people think. According to the EPA, toilets account for nearly 30% of an average home's indoor water use. A worn flapper can silently leak thousands of gallons a year (EPA Fix a Leak Week). Most homeowners don't notice until the water bill doubles.
Step 1: Diagnose — What's Actually Broken?
Lift the tank lid and flush. Watch what happens for 30 seconds after the tank refills. Your toilet is telling you exactly what's wrong.
| Symptom | What's broken | Part you need | Cost |
|---|---|---|---|
| Water trickles into the bowl continuously (you can hear it) | Flapper doesn't seal | Flapper ($3-$8) | $5 |
| Fill valve keeps hissing even after tank is full | Fill valve worn out | Fill valve assembly ($10-$20) | $15 |
| Tank refills every 15-30 minutes by itself ("ghost flush") | Flapper leak — water slowly drains into bowl, triggering refill | Flapper ($3-$8) | $5 |
| Water overflows into the center overflow tube inside the tank | Water level set too high, float maladjusted | Adjust float (free) or replace fill valve ($15) | $0-$15 |
| Handle sticks / flush requires holding | Flush handle or chain loose | Replace handle ($8) or shorten chain (free) | $0-$10 |
The EPA diagnostic test: Put a few drops of food coloring in the tank (not the bowl). Wait 10 minutes without flushing. If color shows up in the bowl, your flapper is leaking. Flush right after the test so the dye doesn't stain the porcelain.
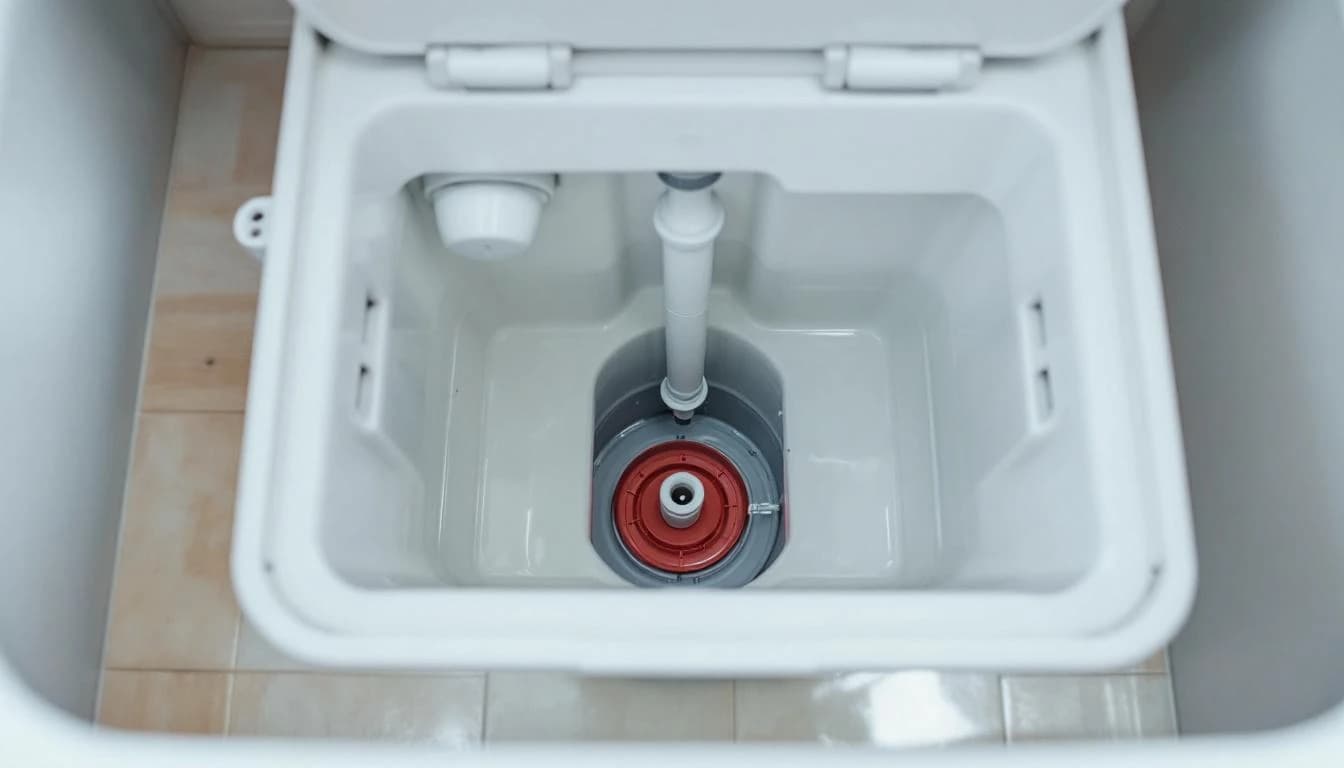
Anatomy of a Toilet Tank
Before you go shopping, know what you're looking at.

- Flapper — the rubber disc at the bottom of the tank, attached by a chain to the flush handle. Lifts when you flush, drops back down to seal.
- Fill valve — the vertical tube on the left side of the tank. Refills the water after flush, shuts off when level is reached.
- Float — either a ball on an arm (old style) or a cup on the fill valve (modern). Tells the fill valve when to stop.
- Overflow tube — the vertical open tube in the middle. Prevents tank from overflowing; also where the small refill tube clips in.
- Flush valve / seat — the plastic opening at the bottom that the flapper seals against. Sometimes cracked or mineral-crusted; a less common failure.
Almost every running toilet traces to the flapper (60-70% of cases), the fill valve (20-25%), or an adjustment problem (5-10%). Knowing which one saves a trip to the hardware store.
What You'll Need
Tools
- Adjustable wrench — for the fill valve lock nut under the tank
- Channel-lock pliers — for stubborn supply line nuts
- Old towel — water always spills
- Sponge — for sopping up the last inch of water in the tank
- Phone camera — photo the inside of the tank before you disassemble
Materials (pick based on your diagnosis)
- Flapper — $3-$8. Match your toilet model. Toilets from American Standard, Kohler, TOTO, and Gerber each use slightly different flappers. "Universal" flappers are a scam for anything other than the most generic toilet. Take the old flapper to the store.
- Fill valve — $10-$20. Fluidmaster 400A and Korky QuietFill 528 are the two safe defaults; both fit almost every standard US toilet.
- Flush handle assembly — $8, only if the handle is broken.
Total materials: $5-$25. A plumber charges $125-$275 for the same repair.
Step 2: Shut Off the Water and Empty the Tank
- Turn the shut-off valve behind/below the toilet clockwise until it stops.
- Flush the toilet. The tank empties and doesn't refill.
- Hold the flapper open to drain the last of the water (or use a sponge to sop up the residual inch).
- Disconnect the water supply line from the bottom of the tank (only if you're replacing the fill valve — skip if doing just a flapper).
Put down a towel under the shut-off valve. Old valves often drip a tablespoon when you turn them. If your valve is seized, don't force it — shut off main water instead and add "replace shut-off valve" to your list for another day.
Step 3A — If It's the Flapper: Replace in 10 Minutes
- Unhook the chain from the flush handle arm (slides out of the hole)
- Pull the old flapper off the two ears on the flush valve (pegs on the sides). It pops right off.
- Inspect the old flapper — if it's warped, stiff, or rubber has gotten crusty, that's your leak source.
- Snap the new flapper on. Make sure both ears are seated.
- Attach the chain to the flush handle arm. Leave just enough slack so the flapper can drop fully but isn't loose enough to get tangled. Usually 1/2 inch of slack at rest.
- Turn water back on. Flush and watch. If the tank refills and then stops silently, you're done.
Chain length is the #1 thing people get wrong. Too tight and the flapper can't fully seat. Too loose and it tangles under the flapper. Test with a few flushes before you put the lid back on.
Step 3B — If It's the Fill Valve: Replace in 20 Minutes
- Unscrew the small refill tube from the top of the fill valve (clips off)
- Under the tank, unscrew the plastic lock nut holding the fill valve to the tank bottom
- Lift the old fill valve straight up and out
- Measure the height of the old fill valve vs. the overflow tube — the new valve's water shut-off level needs to be at least 1" above the overflow tube top. Most modern fill valves are telescoping and adjust in seconds.
- Drop in the new fill valve, thread the lock nut from underneath, snug (don't gorilla-tighten — plastic cracks)
- Reconnect the refill tube to the top of the fill valve, and clip the other end onto the overflow tube (tube points into the overflow tube, not past it)
- Reconnect the water supply line
- Turn water on slowly. Tank should refill to the fill line and stop.
Don't over-tighten the supply line nut. Hand-tight plus a quarter-turn with a wrench is enough. Most plastic fittings crack from over-tightening, not under-tightening.
Step 3C — If the Water Level Is Just Too High: Free Fix
If water is flowing down the overflow tube constantly, the float tells the fill valve to shut off too late.
On modern cup-style floats: there's a plastic adjustment screw on top of the fill valve. Turn counter-clockwise (or clockwise depending on brand — check manual) a few clicks to lower the shut-off point. Flush and watch.
On old ball-and-arm floats: bend the metal arm gently down to lower the float's resting position. Or adjust the screw where the arm meets the fill valve.
Target water level: 1 inch below the top of the overflow tube. Most tanks have a fill line marked inside — aim for that line.
This costs nothing and takes 5 minutes.
Step 4: Turn Water On Slowly and Test
Open the shut-off valve slowly — full-speed pressurization can dislodge a fresh flapper or fill valve. Watch the tank fill. It should:
- Stop at the fill line (about 1" below overflow tube)
- Not leak into the overflow tube
- Be silent after shut-off — no hissing from the fill valve
- Stay silent for 30 minutes without phantom-flushing
Flush 2-3 times. Each flush should:
- Empty the tank fully
- Refill to the line and stop within 60 seconds
- Leave no water trickling into the bowl after refill
If it still runs, you probably have a second issue (e.g., worn flapper AND bad fill valve both). Cheap fixes, so just do the other one.
Pro Tips Tutorials Leave Out
- Take a photo of the tank before you start. The chain attachment, the refill tube position, float adjustment — a reference photo saves 10 minutes of trial and error.
- Don't buy "universal" toilet parts. Especially flappers. Take the old part to the store, match by brand if possible. Korky and Fluidmaster both have handy "which flapper fits my toilet" tools online.
- Mineral buildup on the flush valve seat matters. If your water is hard (most of the US outside the Southeast coast), the seat gets crusty. Scrub with a toothbrush + white vinegar before installing a new flapper.
- Replace both flapper and fill valve if toilet is 10+ years old. You're already in the tank. Both parts cost $15 total and last 7-10 years each. Don't make two trips to the store.
- Chain slack is 1/2 inch at rest. Not less, not more. This one detail is the most common repeat-callback I see on running toilets.
Common Mistakes Plumbers See
- Wrong-size flapper. 2" flappers and 3" flappers look similar from across a hardware store aisle. Take the old one. Or measure the flush valve opening.
- Chain too tight. Flapper can't fully close. Tank runs forever. Happens to everyone at least once.
- Over-tightened plastic nuts. Cracks the tank or the fill valve. Hand-tight + 1/4 turn. Stop.
- Ignoring the fill line mark. Tank overfilled leaks constantly down the overflow tube. Adjust the float to the factory fill line.
- Reusing the old refill tube. It's always brittle and doesn't seal on the new valve. The new fill valve comes with a fresh tube; use it.
Cost Reality Check
| Repair | DIY cost | Handyman | Plumber |
|---|---|---|---|
| Flapper replacement | $5 | $75–$125 | $125–$200 |
| Fill valve replacement | $15 | $100–$150 | $150–$250 |
| Full "rebuild kit" (both + handle) | $25 | $125–$175 | $175–$275 |
| Full toilet replacement | $150–$400 (incl. new toilet) | $250–$550 | $350–$750 |
Labor ranges from HomeAdvisor toilet repair cost guide and Fixr, 2025 averages. Pricing varies 30-50% by region and urgency.
When to Replace Instead of Repair
Skip the repair and swap the whole toilet if:
- Toilet is from before 1994 (federal 1.6 GPF standard) — you're wasting water on every flush, and a $150 modern toilet pays back in 2-4 years
- Visible crack in the tank or bowl (not just a hairline; functional cracks leak)
- Wobbly base, water pooling around the floor — the wax ring is shot, and if the floor is soft, you may have rot
- Chronic clogs, even after plumber visits — old toilets with calcified trapways just don't flush right
- Cosmetic tiredness — stained porcelain that won't clean, broken seat, scratched finish
A WaterSense-certified 1.28 GPF toilet uses 20% less water than the 1.6 GPF federal standard (EPA) and is a 30-minute install. Brands I trust: TOTO, Kohler, American Standard.
When to Call a Professional Instead
Stop and hire someone if:
- Shut-off valve behind the toilet is seized and won't turn
- Water is pooling around the base of the toilet, and the floor feels soft
- Tank has a visible crack or is leaking from the tank bolt area at the bottom
- You've replaced parts twice already in the last 2 years on the same toilet
- You want to install a new toilet but the flange (ring on the floor) is broken — that's a bigger repair
None of those apply? This is a 20-minute job. Go do it.
Any apply? Find a handyman near you — running toilets are usually cheap service calls, and catching water damage early is far cheaper than catching it late.
One Last Thing
Of all the DIY jobs in this series, a running toilet has the best payback ratio — $5 in parts and 20 minutes of your time can save you thousands of gallons of water a year. Most homeowners live with a running toilet for months because they don't realize it's wasting water silently between flushes.
If you opened the tank and realized the flush valve itself is cracked, or the shut-off is seized, or the whole thing is older than you — that's the moment to stop. Find a handyman →
Frequently Asked Questions
How do I know which part of my toilet is broken?
Lift the tank lid and flush. If the flapper (the rubber disc at the bottom) doesn't fully seal when the tank refills, you have a flapper issue — this is 70% of running toilets and a $5 fix. If the fill valve (the vertical tube on the left) keeps hissing after the water reaches the line, the fill valve is worn — a $10-$20 fix. If water is trickling down from the overflow tube (the vertical open tube in the middle), the water level is set too high — usually a float adjustment. The EPA has a simple diagnostic: put a few drops of food coloring in the tank, wait 10 minutes without flushing, and check the bowl. Color in the bowl = flapper leak.
How much water is a running toilet actually wasting?
More than you think. The EPA reports that an old or worn flapper can cause a toilet to silently leak thousands of gallons a year. Because running toilets are often inaudible (the 'ghost flush' that refills the tank every 20 minutes), most homeowners only notice when the water bill arrives. Toilets account for nearly 30% of an average home's indoor water use, so a broken toilet is by far the biggest single water drain in most houses.
Do I need to turn off the water to the whole house?
No. There's a shut-off valve on the wall behind the toilet (or below the tank) — a small oval or round handle on the supply line. Turn it clockwise until it stops. If that valve is stuck, corroded, or missing, shut off the main house water valve. Then flush the toilet to empty the tank before starting repair. Have a towel handy; about a cup of water always dribbles out.
Is it worth repairing an old toilet or should I just replace it?
If your toilet is from before 1994, consider replacing. The federal standard since the Energy Policy Act of 1992 caps new toilets at 1.6 gallons per flush (GPF), and EPA WaterSense-certified models use 1.28 GPF or less. Older toilets use as much as 6 gallons per flush. A $150-$300 modern toilet pays for itself in water savings in 2-4 years. If your toilet is newer and the issue is a single worn part (flapper, fill valve), the $10 repair is almost always the right call.
Why does my toilet keep running after I replaced the flapper?
Three common causes: (1) the new flapper doesn't match your toilet model — flappers are not universal, and 'works on most toilets' rarely means yours; (2) the chain attached to the flush handle is too short and keeps the flapper from seating fully, or too long and gets caught under it; (3) the valve seat (the plastic ring the flapper presses against) is cracked, pitted, or has mineral buildup. For the last one, clean the seat with a toothbrush and vinegar, or replace the whole flush valve assembly.
How much does a plumber charge to fix a running toilet?
A plumber typically charges $125-$275 for a running toilet repair — a 1-hour minimum service call plus parts. A handyman charges $75-$150 for the same job. If you end up replacing the entire toilet, add $150-$350 labor for installation. Hire a [handyman near you](/handyman-services) if the tank has visible cracks or the shut-off valve won't turn.
Your skills deserve to be seen.
Join handymen who use HandymanCan to get found by local clients — completely free.
No credit card. No catch. Takes 5 minutes.
Related Articles
How to Unclog a Drain: The Safe Order of Operations (2026)
Unclog a kitchen, bathroom, or shower drain without chemicals in most cases. Plunger, baking soda, snake, P-trap — plus the drain cleaner safety rules the bottle doesn't mention.
How to Patch a Hole in Drywall: Small, Medium, and Fist-Sized Fixes
Patch any drywall hole — from nail pops to a doorknob-sized crater — in under 2 hours. The right method for each hole size, the tools that matter, and how to make the patch invisible after paint.
How to Install Laminate Flooring: A Realistic Weekend DIY Guide
Install laminate flooring yourself in 1-2 days for a 200 sq ft room. Subfloor prep, underlayment, click-lock planking, expansion gaps, and trim reinstall — plus what to check before you buy for indoor air safety.